Artisan Design Team Blog Hop – Posted For You Bundle

Hey Everyone

Welcome to my blog and the last 2020 Stampin’ Up! Artisan Design Team Blog Hop for the year.

I’m excited to share these projects with you but at the same time, I’m sad as this is my final hop as part of this amazing, fun and very talented team. The projects we have created are all made with the Posted For You Bundle.

This bundle consists of a fabulous stamp set – called Postage Due Stamp Set – with images and sentiments that fit the coordinating Rectangular Postage Stamp Punch.

The first card I created has an embossed background with the Brick and Mortar 3D Embossing Folder and an ink splattered background – created with my Dark Smoky Slate Blend. I took some Cardstock and Sahara Sand Cardstock and punched out four rectangles with the Rectangular Postage Stamp Punch. I played around with layering until I came up with the following layout. I then punched a Whisper White rectangle so the flower images popped with a white background. The flower images were stamped with Black Memento Ink and coloured with a combination of Magenta Madness and Smoky Slate Blends. I fussy cut these out and raised them up with Dimensionals. I took the circular postage stamp image and hand cut around the image. The sentiment I’ve added to my card is from the Postage Due Stamp Set – I’ve used the happy birthday sentiment on this card – as you can never have too many birthday cards in your stash. To finish off this card I added three Metallic Pearls in a triangle pattern.

The second card I created has a daubed Magenta Madness background that has been matted with a piece of Sahara Sand Cardstock. I took my Dark Smoky Slate Blend and flicked some ink by taking the nib of the blend and flicking it against the lid. I then punched three pieces of cardstock with the Rectangular Postage Stamp Punch and layered them with a circle punch of Vellum Cardstock. I stamped the round postage stamp image and cut this image out by hand. I added a strip of Basic Gray Cardstock and layered it under a sentiment from the Postage Due Stamp Set. Three Metallic Pearls finished of this card similarly to the first card. To add some texture, I ran my finger around the Whisper White Cardstock and roughed up the edges.

Take a look below at all of the pretty projects the team have created for you.

The next blog on the hop is my talented friend Nina Waldschmidt. Click here to take you to her blog or on the button below.

2020 Stampin’ Up! Artisan Design Team Roll

Caroline van der Straaten

Emma Goddard

Helene den Breejen

Jan Clothier

Lauren Alarid

Leah Fedynak

Manuela Geiswinkler

Marine Wiplier

Martha Groger

Martin Stone

Narelle Farrugia

Nina Waldschmidt

Rochelle Blok

Stesha Bloodhart

Tammy Wilson

Zsuzsanna Balazs

And now to introduce our amazing 2021 Stampin’ Up! Artisan Design Team

Alicia YapBlog | Instagram

Angela Meiritz-Reid Blog | Instagram

Anna Pickering Blog | Instagram

Brenda NelsonBlog | Instagram

Chelsey ChristensenBlog | Instagram

Chloe EvansBlog | Instagram

Christine WredeBlog | Instagram

Elodie VentrouxBlog | Instagram

Hélène den Breejen Blog | Instagram

Janneke Dijkstra de Jong Blog | Instagram

Leah FedynakBlog | Instagram

Lisa FlemmingBlog | Instagram

Manuela GeiswinklerBlog | Instagram

Martin Stone Blog | Instagram

Melanie JoynerBlog | Instagram

Narelle FasuloBlog | Instagram

Susan WongBlog | Instagram

Tami HewlettBlog | Instagram

Tammy WilsonBlog | Instagram

Tatiana TobinBlog | Instagram

Zsuzsánna Balázs  Blog | Instagram

Make sure you check out each of their socials! I’m so excited for each and every one of them and can’t wait to see what they create for 2021!

Products Used

Cardstock: Thick Whisper White Cardstock, Sahara Sand Cardstock, Basic Gray Cardstock, Magenta Madness Cardstock

Stamp Set:  :Posted for You Stamp Set

Ink: Black Memento Ink, Magenta Madness Blends, Smoky Slate Blends, Magenta Madness Ink

Other Products: Rectangular Postage Stamp Punch, Metallic Pearls, Brick & Mortar 3D Embossing Folder, Vellum Cardstock, 2″ Circle Punch, Dimensionals

Thanks for stopping by.

Cheers

Narelle
Artisan Design Team Blog Hop – Snowflake Splendor Suite

Hey Everyone

Welcome to my blog and the latest Stampin’ Up! Artisan Design Team Blog Hop. This month the team have created projects with the gorgeous products from the Snowflake Splendor Suite.

I’ve created a Christmas Card along with a gift box filled with gift cards.

For the card I created, I daubed some Whisper White Cardstock with some Pool Party Ink. I started at the top on the left and daubed to the middle and then across to the bottom left side of the card. I then took the little snowflake stamp from the Snowflake Wishes Stamp Set and some Merry Merlot Ink and stamped in the three places I wanted to add my snowflakes. I matted this cardstock on a piece of DSP from the Snowflake Splendor Designer Series Paper pack and a piece of Merry Merlot Cardstock.

I ran some Whisper White Cardstock and Balmy Blue Glimmer Paper through my cutting machine. with some snowflake dies from the So Many Snowflake Dies. To add some embellishments and bling to my card, I added a strip of Snowflake Splendor 1/4″ Ribbon and Blue Adhesive-Backed Gems. The sentiment I’ve added is from the Snowflake Wishes Stamp Set. This sentiment has been stamped in Black Memento Ink.

My next project is a gift box. I took the same snowflake cluster image from the Snowflake Wishes Stamp Set and stamped the Mini Paper Pumpkin Box with Merry Merlot Ink. I then created a belly band of Merry Merlot Cardstock, Whisper White Cardstock and a strip of DSP from the Snowflake Splendor Designer Series Paper pack.

I then added the pretties of diecuts, ribbon and gem that I used on my first card.

I made 6 gifts cards to fit the Mini Paper Pumpkin Box. These cards were quick and easy as I made them all with the same design. I cut my Whisper White Cardstock to size and added a piece of Merry Merlot Cardstock and DSP. The same ribbon and diecuts were adhered with sentiments from the Snowflake Wishes Stamp Set.

I hope you like the projects I created with this suite – I thoroughly loved playing with all of the products! The next amazing Artisan on the hop is my talented friend Nina Waldschmidt. Click here to continue along the hop or on the button below.

2020 Artisan Design Team Roll

Caroline van der Straaten

Emma Goddard

Helene den Breejen

Jan Clothier

Lauren Alarid

Leah Fedynak

Manuela Geiswinkler

Marine Wiplier

Martha Groger

Martin Stone

Narelle Farrugia

Nina Waldschmidt

Rochelle Blok

Stesha Bloodhart

Tammy Wilson

Zsuzsanna Balazs

Products Used

Cardstock: Thick Whisper White Cardstock, Merry Merlot Cardstock, Snowflake Splendor Designer Series Paper, Balmy Blue Glimmer Paper

Stamp Set:  Snowflake Wishes Stamp Set

Ink: Black Memento Ink, Merry Merlot Ink, Pool Party Ink

Other Products: Snowflake Splendor 1/4″ Ribbon, Blue Adhesive-Backed Gems, So Many Snowflake Dies, Mini Paper Pumpkin Box

Thanks for stopping by.

Cheers

Narelle

Artisan Design Team Blog Hop – Curvy Celebrations

Hey Everyone

Welcome to my blog and a special hop the Stampin’ Up! Artisan Design Team have for you using the Curvy Celebrations products.

The Curvy Celebrations promotion is available for all of your customers to purchase from 3rd November, just in time for them to get on to their Christmas creations. These products are an exclusive release and a first glimpse of the January – June 2021 Mini Catalogue. I like to create in a range of colours, so my cards have the same colours to keep them consistent.

My first card is the card I created for our last hop. I created a fun fold card using the dies to create interesting edges. For this sample I used the Quite Curvy Stamp Set and Curvy Dies. This stamp set is so versatile that can be used for all occasions. The sentiment I’ve used on this card, would be perfect for a loved one, a friend or even a wedding.

For this hop I used the same curvy die I used on my fun fold card. I eyeballed how far down I wanted the curve on the Whisper White Cardstock and ran it through my cutting machine. I wanted a mix of patterned paper on my card, so I took three different pieces of Sahara Sand DSP from the Classic Christmas Designer Series Paper pack and cut them to size. I added Dimensionals to the DSP and layered them on my card.

The leaves from the Curvy Christmas Stamp Set have been stamped in Shaded Spruce and Mint Macaron Ink and then fussy cut out. I then inked up some bows, also from the Curvy Christmas Stamp Set, and coloured them with a combination of Purple Posy and Highland Heather Blends. The sentiment I’ve adhered to my card is the perfect size for layering over images and doesn’t detract from the images. Three Metallic Pearls finished off my card.

Even though this card is layered, it is quite a simple layout, but effective with the curve and the Sahara Sand Cardstock base showing through.

I hope you’ve enjoyed looking at the projects I’ve created with these products. Make sure you click here or on the button below to continue along the hop to see what the team have all created. The next talented designer on the hop is Nina Waldschmidt.

2020 Artisan Design Team Roll

Caroline van der Straaten

Emma Goddard

Helene den Breejen

Jan Clothier

Lauren Alarid

Leah Fedynak

Manuela Geiswinkler

Marine Wiplier

Martha Groger

Martin Stone

Narelle Farrugia

Nina Waldschmidt

Rochelle Blok

Stesha Bloodhart

Tammy Wilson

Zsuzsanna Balazs

Products Used

Cardstock: Thick Whisper White Cardstock, Sahara Sand Cardstock, Classic Christmas Designer Series Paper

Stamp Set:  Curvy Christmas, Quite Curvy

Ink: Black Memento Ink, Purple Posy Blends, Highland Heather Blends, Mint Macaron Ink, Shaded Spruce Ink

Other Products: Curvy Dies, Metallic Pearls, Dimensionals

Thanks for stopping by.

Cheers

Narelle

Artisan Design Team Blog Hop – Curvy Celebrations

Hey Everyone

The 2020 Stampin’ Up! Artisan Design Team are back with an exciting hop for you. We’ve created projects featuring the Curvy Celebrations products. This new promotion features two early-release products from the January—June 2021 Mini Catalog, plus two exclusive products available for a limited time only!  As a demonstrator you are able to pre-order these products from 1st October 2020. If you’re like me, you’ll want to create projects as soon as possible to show your customers – so put in an order early to get creating.

Your customers can purchase Curvy Celebrations products beginning 3 November 2020. This promotion offers customers an opportunity to purchase early, gives them a first glance at the look and feel of the new mini catalog, and exclusive products perfect for Christmas crafting.

I’ve created a fun fold card that has both sides of the front panels cut with the Curvy Dies. I didn’t measure these, I just eye-balled what gap I would like and put it through my cutting machine.

The stamp set I’ve used for my card is the Quite Curvy Stamp Set. This stamp set combines perfectly with the Curvy Dies. I couldn’t resist adding two little birds (also from the Quite Curvy Stamp Set) as they are so darn cute!  The birds are stamped with Black Memento Ink and coloured really quickly with Crumb Cake and Highland Heather Blends.  The two little leaf stems are also made with the Curvy Dies.

I added a panel of Sahara Sand Cardstock to the left side of my card. This creates a flap that opens and also a base for the vines and leaves to be adhered to.  I used dimensionals to raise the vines up so that when the right side is closed, the vines hold the sentiment in place – you can see this in the photo above. I also added a strip of Whisper White 1/4″ Crinkled Seam Binding to tie both sides together.

The vine image has been stamped twice and cut with the matching die from the Curvy Dies set. I’ve coloured the vines in Soft Sea Foam and Light Old Olive Blends. The flowers that I’ve added to my vine leaves are also from the Quite Curvy Set. These flower images have been coloured with Highland Heather Blends, trimmed and added along the vine leaves to add some colour.

I hope you like what I’ve created. Make sure you check out the amazing projects the team have created.  I know after you see their creations, you’re going to want to get your hands on these products, like yesterday!
The next Artisan Design Team Member on the hop is the amazing Nina Waldschmidt.  Click here or on the button below to continue the hop.


2020 Artisan Design Team Roll

Caroline van der Straaten

Emma Goddard

Helene den Breejen

Jan Clothier

Lauren Alarid

Leah Fedynak

Manuela Geiswinkler

Marine Wiplier

Martha Groger

Martin Stone

Narelle Farrugia

Nina Waldschmidt

Rochelle Blok

Stesha Bloodhart

Tammy Wilson

Zsuzsanna Balazs

Products Used

Cardstock: Thick Whisper White Cardstock, Sahara Sand Cardstock

Stamp Set: Quite Curvy Stamp Set

Ink: Black Memento Ink, Sahara Sand Ink, Soft Sea Foam Blends, Highland Heather Blends, Crumb Cake Blends, Old Olive Blends

Other Products: Whisper White 1/4″ Crinkled Seam Binding Ribbon, Dimensionals, Metallic Pearls, Curvy Dies

Thanks for stopping by.

Cheers

Narelle

Artisan Design Team Blog Hop – Poinsettia Place Suite

Hey Everyone

Welcome to the latest Stampin’ Up! Artisan Design Team Blog Hop.  This month we are showcasing projects we’ve made with products from the Poinsettia Place Suite.

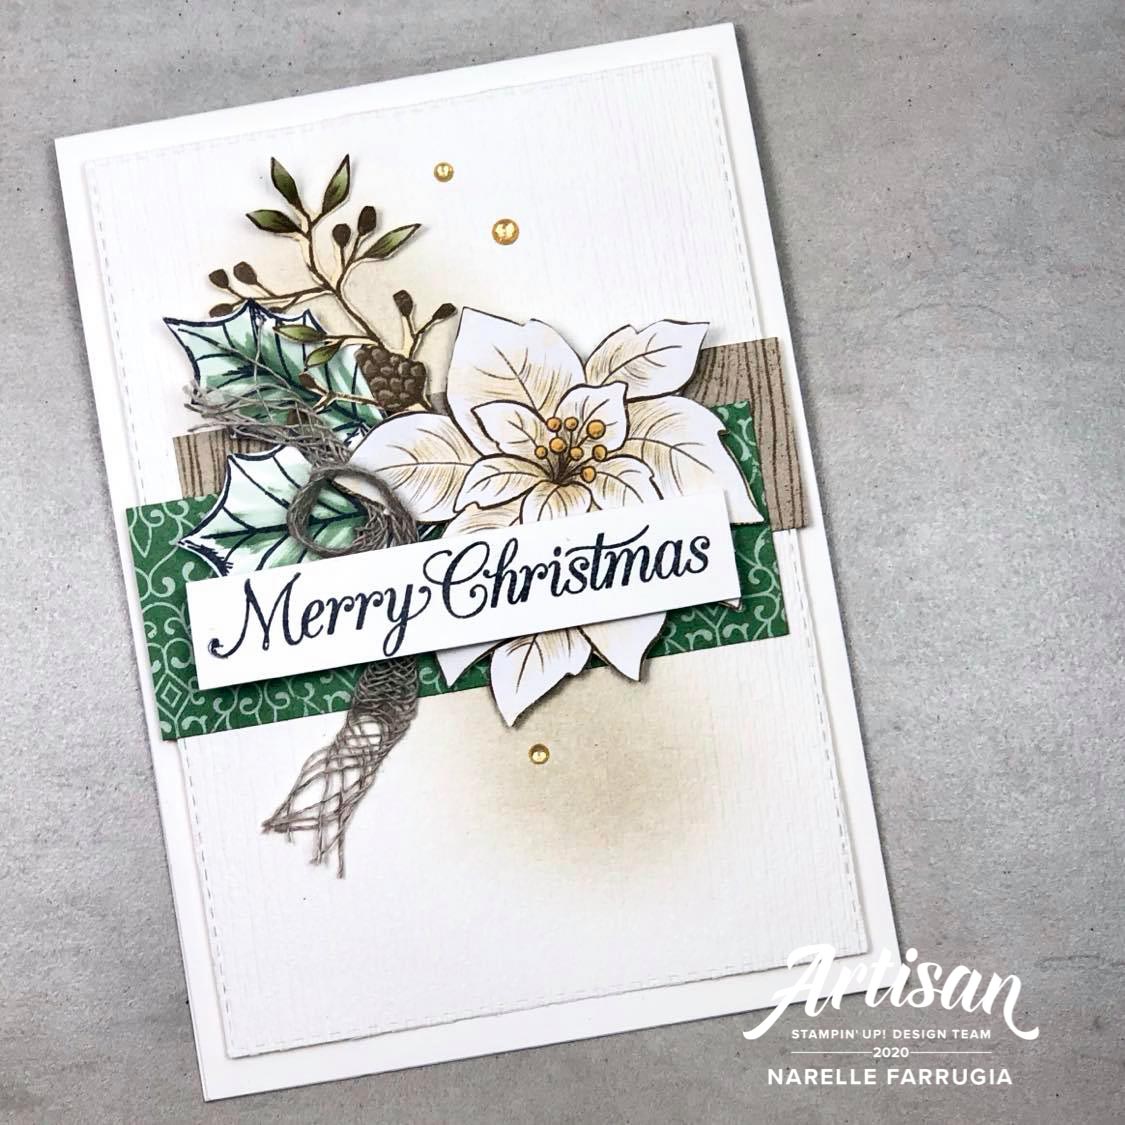
All of the products in this suite are AMAZING! I’ve been making a heap of cards with the Poinsettia Place Stamp Set, so this time I wanted to show off the pretty and perfectly coloured poinsettias that you can trim from the Poinsettia Place Designer Series Paper pack.  I also trimmed the leafy stem and pine cones images from the DSP and adhered them to my card.  The large leaves that I’ve paired with my poinsettia are stamped with the leaf images from the Poinsettia Place Stamp Set. They’ve been coloured with my Mint Macaron Blends.

I cut the card base with a Rectangle Stitched Die and daubed Sahara Sand Ink on the Thick Whisper White Cardstock.To add some texture, I ran this piece through my embossing machine with the Subtle 3D Embossing Folder. I then added a combination of papers from the Poinsettia Place DSP pack. Once I was happy with the layering of my poinsettias and sentiment, I then took my favourite Braided Linen Thread and layered it amongst the flower and leaves. Three Gold Glitter Enamel Dots finished off this card.

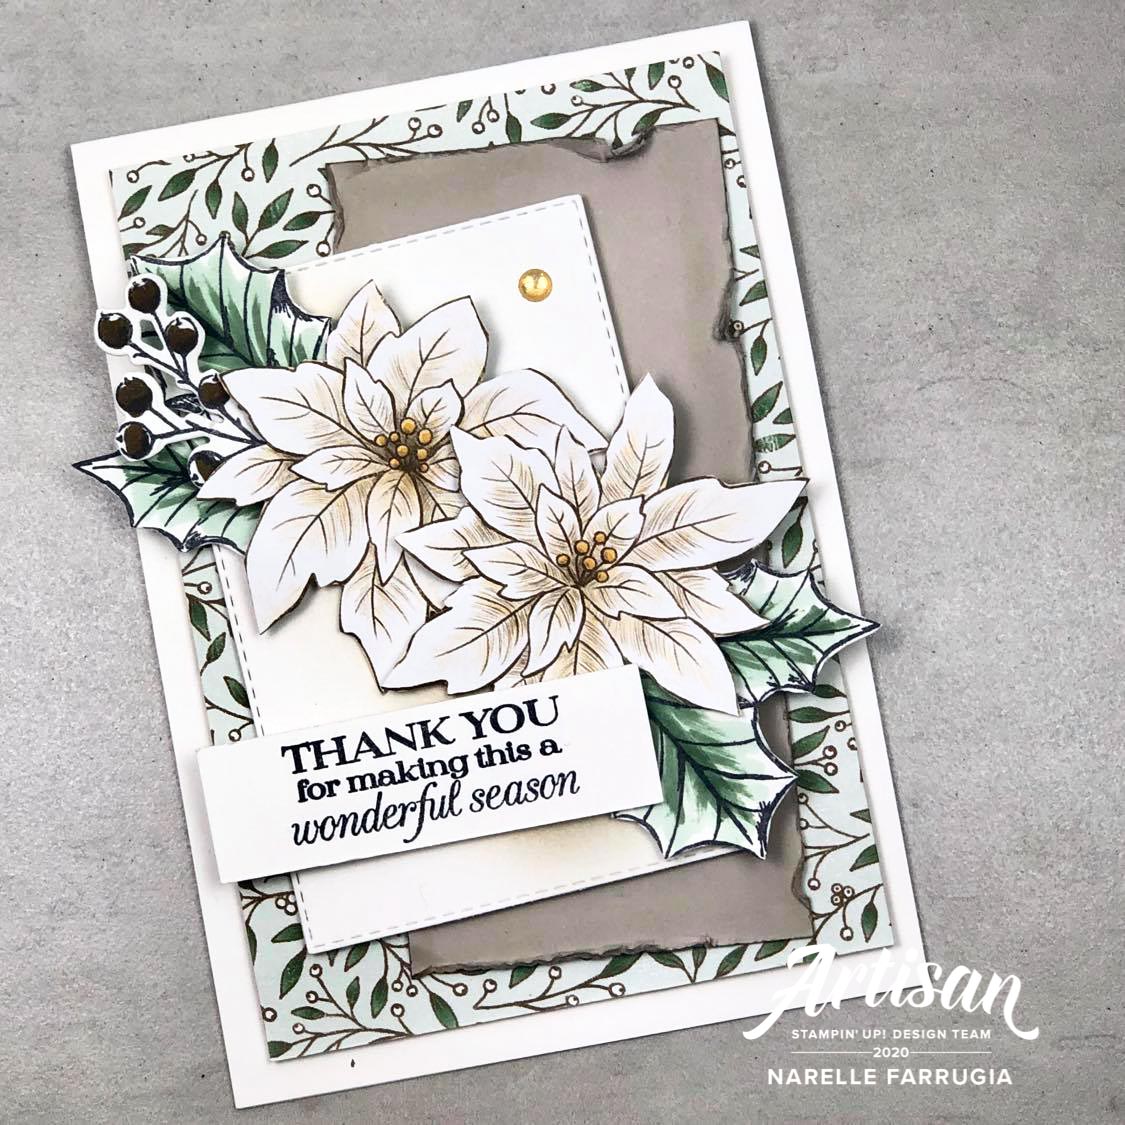
Like my first card, my poinsettias are trimmed from the Poinsettia Place Designer Series Paper and the leaves are stamped from the Poinsettia Petals Stamp Set.  For this card, I added some stamped holly berries that have been cut with the Poinsettia Dies.

The DSP I’ve added to the base of my card is also from the Poinsettia Place Designer Series Paper pack. I took a piece of Sahara Sand Cardstock and daubed the edges before using my fingernail to rough up the cardstock.  One Gold Enamel Glimmer Dot was added to this card.

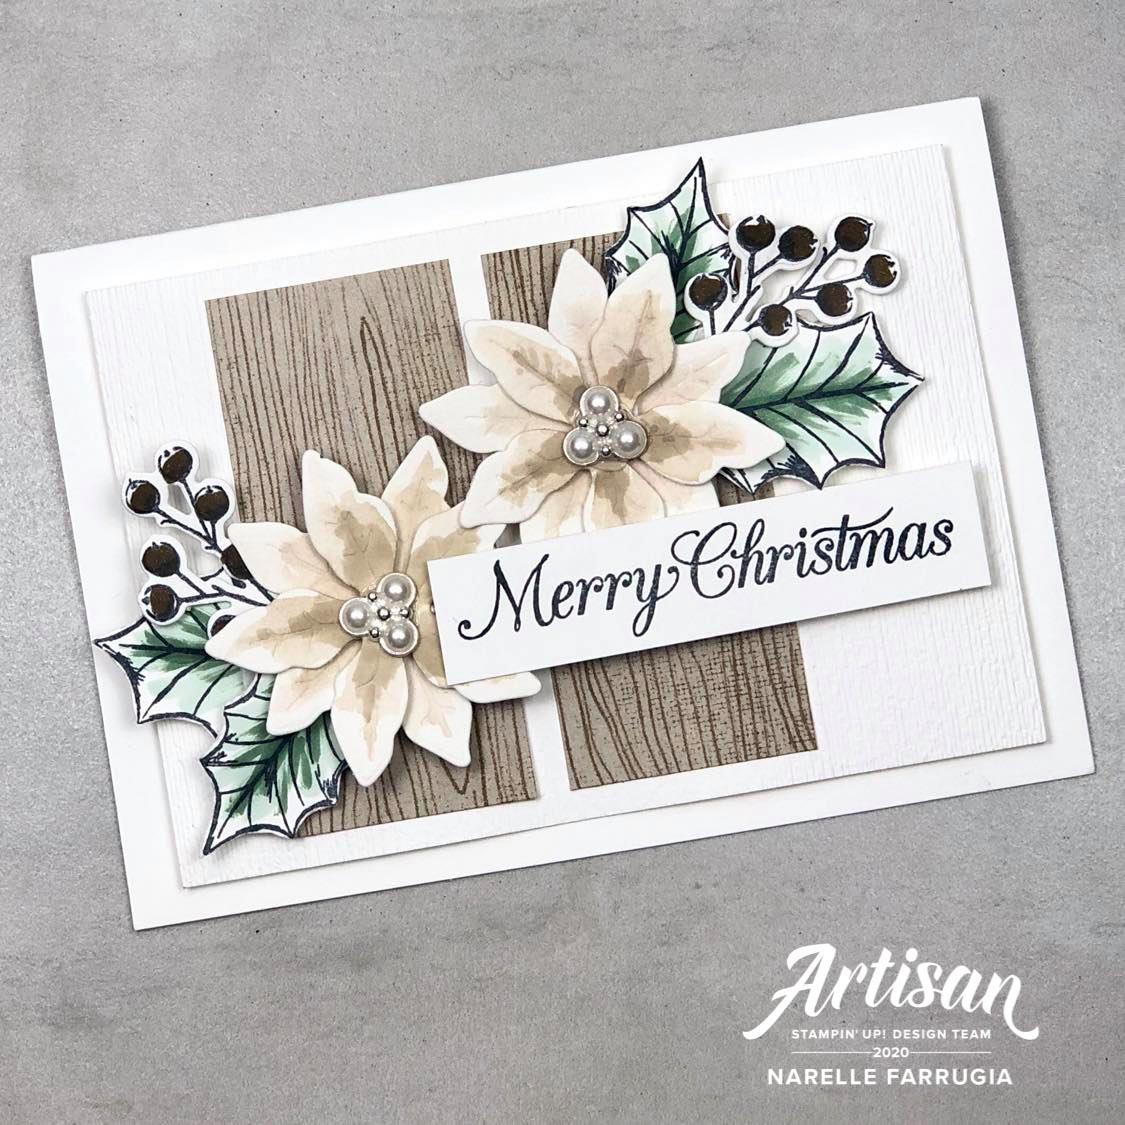
For my third card, I created my own poinsettia’s by cutting some poinsettia die cuts with the Poinsettia Dies. I took my Water Painter and some Sahara Sand Ink and added colour to the die cuts, adding a darker shade to the centre of the flowers.  I couldn’t resist adhering Beaded Pearls to the centre of the die cuts to make them pretty and bling-y. I kept my layering simple with this card to let the poinsettias shine.

I hope you like the projects I’ve created with these products. Make sure you check out all the wonderful projects the team have created. The next hop along the way is my very talented friend Nina Waldschmidt with her creations. Click here to take you to her blog or on the button below.

2020 Artisan Design Team Roll

Caroline van der Straaten

Emma Goddard

Helene den Breejen

Jan Clothier

Lauren Alarid

Leah Fedynak

Manuela Geiswinkler

Marine Wiplier

Martha Groger

Martin Stone

Narelle Farrugia

Nina Waldschmidt

Rochelle Blok

Stesha Bloodhart

Tammy Wilson

Zsuzsanna Balazs

Products Used

Cardstock: Thick Whisper White Cardstock, Sahara Sand Cardstock, Poinsettia Place Designer Series Paper

Stamp Set: Poinsettia Petals

Ink: Black Memento Ink, Sahara Sand Ink, Soft Suede Ink

Other Products: Poinsettia Dies, Braided Linen Thread, Beaded Pearls, Mint Macaron Blends, Gold Glitter Enamel Dots, Rectangle Stitched Dies, Subtle 3D Embossing Folder

Thanks for stopping by.

Cheers

Narelle

Artisan Design Team Blog Hop – Peace and Joy Bundle

Hey Everyone

Hello stamping friends. It’s time for the latest Stampin’ Up! Artisan Design Team Blog Hop!

This month the team have created  projects using products from the Peace and Joy Bundle. This bundle is available to order form the August-December 2020 Mini Catalogue.  Having these products early means that hopefully I will be ready with all of my Christmas cards and gift packaging.

We have all created three projects using this fabulous bundle. For each of our projects, we have created the following:

  • One sample using the Peace and Joy Stamp set only.
  • The second project using dies only from the Joy Dies.
  • And the third with both the stamp set and the dies.

To create my first card, I stamped various leaves from the Peace and Joy Stamp Set in Soft Sea Foam and Just Jade Inks. To create the washed background, I took my Light Soft Sea Foam Blend and coloured some Whisper White Cardstock. As you can see, I cut this piece around a third of the way down and added a piece of Sahara Sand Cardstock and torn Midnight Muse Cardstock underneath it.

I’ve used a combination of sentiments from the Peace and Joy Stamp Set.  I really love this combo of a large script-y sentiment and a solid background with white typed sentiment. I added some Braided Linen Trim and layered my circles over the top.  I then took the fussy cut leaves, berries and adhered them around the main sentiment.  Three white gems from the Flowers for Every Season Gems finished off this card.

The second project I’ve made is a shaker card using the Joy Dies. I started off with cutting a square piece of Whisper White Cardstock and a solid sentiment die. By using the solid sentiment for the shaker window, this then allowed me to cut the thin sentiment in Midnight Muse Cardstock to layer over my window sheet. I’ve probably thrown in way too many sequins, from the Sequins for Everything pack, behind the sentiment. I always either have too many sequins and then the next time, not enough….

To pair with my first card, I added a washed background with the Light Soft Sea Foam Blend and added a torn strip of Just Jade Cardstock. I also used three gems from the Flowers For Every Season Gems to bling up my card.

For my third and final project, I added texture and interest to the background by cutting multiple sentiments in Whisper White Cardstock and adhering them to the card base. I cut two circles, one in Midnight Muse Cardstock and the other in Whisper White Cardstock, with the 2 1/4″ Circle Punch. Keeping off-cut strips of cardstock is so handy when you need to tie in colours to maintain a consistency with your projects. I’ve added a Just Jade Cardstock strip to this card.

Because I LOVE Braided Linen Trim as if it were one of my own children, I couldn’t resist adding it to this card too. For the sentiment, I used the solid and thin sentiments dies for this card. I also added a stamped sentiment because I liked the solid typed font.  I then repeated the stamping I did for my first card with the same leaves and colours. This time only one gem was added – didn’t want to overpower the stamping with too much bling!

I hope you’ve enjoyed the cards I’ve made using the Peace and Joy Bundle. I loved playing with these fabulous products, not only because they’re gorgeous, but it’s given me more cards that I’ve added to my Christmas card stash.

The next talented Artisan on the hop is the lovely Nina Waldschmidt.  Click here to take you to her blog or click on the button below.

2020 Artisan Design Team Roll

Caroline van der Straaten

Emma Goddard

Helene den Breejen

Jan Clothier

Lauren Alarid

Leah Fedynak

Manuela Geiswinkler

Marine Wiplier

Martha Groger

Martin Stone

Narelle Farrugia

Nina Waldschmidt

Rochelle Blok

Stesha Bloodhart

Tammy Wilson

Zsuzsanna Balazs

Products Used

Cardstock: Thick Whisper White Cardstock, Just Jade Cardstock, Midnight Muse Cardstock, Sahara Sand Cardstock

Stamp Set: Peace and Joy Stamp Set

Ink: Midnight Muse Ink, Light Soft Sea Foam Blend, Soft Sea Foam Ink, Just Jade Ink, Blushing Bride Ink

Other Products: Joy Dies, Sequins For Everything, 2 1/4″ Circle Punch, 2″ Circle Punch, Braided Linen Trim, Flowers For Every Season Gems, Glue Dots, Dimensionals, Window Sheet.

Thanks for stopping by.

Cheers

Narelle